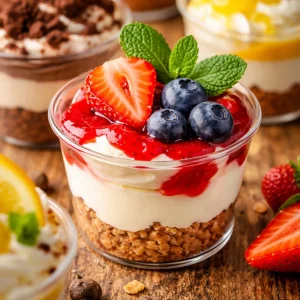
Dessert Cups

There’s something undeniably delightful about dessert cups, especially when they are as creamy and luscious as these! I’ve had my fair share of desserts, but these layered treats are a true standout. With a delightful combination of no-bake cheesecake, Oreo mousse, and dirt pudding, they’re sure to impress at any gathering—be it a family brunch, a birthday party, or simply a cozy night in. The beauty of this recipe lies not just in its charming presentation but in the ease with which it comes together. It brings joy and satisfaction, making it a must-try for any dessert lover.
What Makes This Recipe Special
You’ll absolutely love making and sharing these dessert cups for several reasons. Firstly, they’re incredibly versatile and can be customized to suit personal tastes or seasonal fruits. They also cater to any occasion—from festive holidays to simple weeknight treats. Imagine pulling a tray of these colorful cups out at a family gathering; the smiles on everyone’s faces will be priceless! Not to mention, this recipe is budget-friendly and doesn’t require any baking, which means it’s perfect for anyone looking to whip up something impressive without the hassle of an oven.
“I made these dessert cups for my daughter’s birthday, and they were a huge hit! The combination of flavors and textures was simply irresistible!”
Preparing Dessert Cups
Let’s break down how to create these delightful layers. You’ll find that making these dessert cups is straightforward, with just a few key steps to achieve a stunning final presentation. The process involves combining creamy elements with crunchy textures and fresh fruits, creating a multi-sensory experience that’s hard to resist.
Gather These Items
To make these dessert cups, you’ll need the following ingredients:
- 8 oz cream cheese
- 1 cup powdered sugar
- 1 cup heavy cream
- 1 tsp vanilla extract
- Fresh fruit (strawberries, blueberries, etc.)
- 1 package Oreo cookies
- 1 cup milk
- 1 package instant chocolate pudding mix
- Gummy worms
- Chocolate crumbs or dirt (for dirt pudding)
Feel free to swap out fruits based on what’s in season or use low-fat cream cheese if you’re looking to lighten things up.
Step-by-Step Instructions
- Begin by making the no-bake cheesecake layer. In a mixing bowl, beat together the cream cheese and powdered sugar until smooth and creamy.
- In another bowl, whip the heavy cream until you see stiff peaks. Gently fold this whipped cream into the cream cheese mixture. Once combined, layer this creamy delight into your cups and add a layer of fresh fruit on top.
- For the Oreo mousse, crush up the Oreo cookies into fine crumbs. Mix them with milk and the instant chocolate pudding according to the package instructions. Fold in some whipped cream for extra fluffiness, then layer this mousse into the cups atop the cheesecake layer.
- Finally, prepare the dirt pudding by making another layer of instant pudding. Add crushed Oreos on top for that gritty “dirt” look, and throw in some gummy worms for fun. Chill your dessert cups in the refrigerator before serving.
How to Plate and Pair
When serving these dessert cups, consider using clear glass cups to show off the beautiful layers. You can top them with additional whipped cream, a sprinkle of chocolate crumbs, or a fresh mint leaf for a touch of color. These cups are perfect on their own, but they also pair well with a cup of coffee or a scoop of vanilla ice cream for an extra sweet treat.
Keeping Leftovers Fresh
To keep your dessert cups fresh, store them in an airtight container in the refrigerator. They will generally last for about 3-5 days. If you pour any layers on top of one another, remember that the textures need to be preserved, so store them separately if possible.
Helpful Cooking Tips
Here are a few tips to ensure your dessert cups turn out perfectly:
- Make sure your cream cheese is at room temperature before mixing; this ensures a smooth texture.
- When whipping the cream, be cautious not to over-whip—stiff peaks are great, but going too far can turn your cream into butter!
- Customize your dessert cups with different fruits, toppings, and flavors. Try swapping in different cookies or flavoring your whipped cream.
Creative Twists
Feel free to experiment with your dessert cups:
- Instead of Oreos, try crushed graham crackers for a s’mores-inspired treat.
- For a tropical twist, use coconut cream and top with pineapple and macadamia nuts.
- You might even consider layering in some caramel or peanut butter for an indulgent surprise.
Common Questions
Q: How long does it take to make these dessert cups?
A: Preparation time is around 20-30 minutes. However, chilling time is essential to achieve the best texture, so factor in a couple of hours.
Q: Can I make these dessert cups ahead of time?
A: Absolutely! You can prepare them a day in advance, making them perfect for parties or gatherings.
Q: Are there any dietary adjustments I can make?
A: Yes, you can use dairy-free cream cheese and whipped toppings if you need a vegan version. For gluten-free options, use gluten-free cookies.
With these easy steps and helpful tips, you’re well on your way to impress family and friends with your scrumptious dessert cups! Enjoy the delightful layers and let your creativity shine.
Layered Dessert Cups
Ingredients
For the Cheesecake Layer
- 8 oz cream cheese Make sure it's at room temperature.
- 1 cup powdered sugar
- 1 cup heavy cream Whip until stiff peaks.
- 1 tsp vanilla extract
- 1 cup fresh fruit (strawberries, blueberries, etc.) Feel free to swap out based on the season.
For the Oreo Mousse Layer
- 1 package Oreo cookies Crushed into fine crumbs.
- 1 cup milk
- 1 package instant chocolate pudding mix Prepare according to package instructions.
- 1 cup whipped cream Fold into the Oreo mixture for fluffiness.
For the Dirt Pudding Layer
- 1 package instant pudding mix Use chocolate or vanilla.
- 1 package Oreo cookies (for topping) Crushed for a gritty appearance.
- to taste gummy worms For garnish.
Instructions
Preparation
- In a mixing bowl, beat the cream cheese and powdered sugar until smooth and creamy.
- In another bowl, whip the heavy cream until stiff peaks form, then gently fold it into the cream cheese mixture.
- Layer the creamy cheesecake mixture into clear cups and add a layer of fresh fruit on top.
- For the Oreo mousse, crush Oreo cookies into fine crumbs, mix with milk and instant chocolate pudding according to package instructions, and fold in whipped cream.
- Layer the Oreo mousse on top of the cheesecake layer.
- Prepare another layer of instant pudding as per the instructions for dirt pudding, and add crushed Oreos on top for a dirt effect.
- Garnish with gummy worms and chill the dessert cups in the refrigerator before serving.